1. 실습
1. 모노레포 구축
- 루트의 package.json 생성
- yarn berry를 패키지 매니저로 사용할 것이다.
yarn init-y
{
  "name": "gloddy",
  "version": "1.0.0",
  "description": "",
  "main": "index.js",
  "private": true,
  "workspaces": {
    "packages": [
      "packages/*"
    ],
    "nohoist": [
      "/packages/app/**"
    ]
  },
  "packageManager": "yarn@3.6.0",
  "scripts": {
    "test": "echo \"Error: no test specified\" && exit 1",
    "web": "yarn workspace @gloddy/web",
    "app": "yarn workspace @gloddy/app"
  },
  "devDependencies": {
    "husky": "^9.0.7"
  }
}
루트의 package.json은 workspace에서 공통으로 사용할 모듈을 관리한다. 현재, husky만 설치되어 있으며, prettier, typescript같은 공통으로 사용할 모듈을 추가할 것이다.
- .gitignore 추가
2. Next.js 패키지
-
packages/web으로 폴더 묶기
-
package.json의 name 수정{ "name":"@gloddy/web" }여기서 name은 모노레포의 다른 패키지에서 접근할 때 사용할 이름이다.
3. React Native 패키지
-
packages/app으로 폴더 묶기
-
package.json 수정
{ "name":"@gloddy/app" } -
no-hoist설정모듈을 hoist할 경우, 루트에 모듈이 설치된다. 그래서 ios, android의 네이티브 코드에서 직접 경로를수정해야 한다. 이러한 과정을 하지 않기 위해서는 no-hoist설정을 통해 루트가 아닌, react-native 폴더에 모듈을 설치하도록 할 수 있다.
// packages/app/package.json { // .. "nohoist":[ "/packages/app/**" ] } -
yarn berry가 아닌, yarn classic 설정
기존 React Native에서 사용하던 패키지 관리자는 npm이었다. yarn berry의 PNP로 마이그레이션을 할 경우 의존성 문제를 마주할 것을 생각해, 우선 yarn으로 마이그레이션만 하기로 결정했다. 나중에 순차적으로 yarn berry의 pnp로 마이그레이션을 할 예정이다.
모노레포의 전체적인 패키지 매니저는 yarn berry이므로, react-native패키지에 한해서 yarn classic으로 설정할 것이다.
// packages/app/package.json
{
	// ..
	"packgeManager" : "yarn@1.22.19",
}
// packages/app/.yarnrc.yml nodeLinker:node-modules// .yarnignore packages/app/**
4. typescript, eslint, prettier 설정
1. typescript 설정
tsconfig는 루트에서 base를 설정하고, 각 패키지에서 상속받아 설정한다.
-
typescript는 루트와 각 패키지에서 설치한다. 루트의 tsconfig에서 공통된 tsconfig를 설정하고, 각 패키지에서 루트의 tsconfig를 상속받아 설정할 수 있다.
// tsconfig.json
{
  "compilerOptions": {
    "allowSyntheticDefaultImports": true,
    "moduleResolution": "Node",
    "resolveJsonModule": true,
    "esModuleInterop": true,
    "strict": true,
    "target": "es5",
    "lib": ["ES5", "ES6", "ESNext", "DOM"],
    "skipLibCheck": true,
    "baseUrl": ".",
    "forceConsistentCasingInFileNames": true,
    "module": "esnext",
    "isolatedModules": true
  },
  "exclude": ["packages/**/dist/**"]
}
// packages/web/tsconfig.json, packages/app/tsconfig.json { "extends":"../../tsconfig.json", // .. } -
vscode 버전 설정
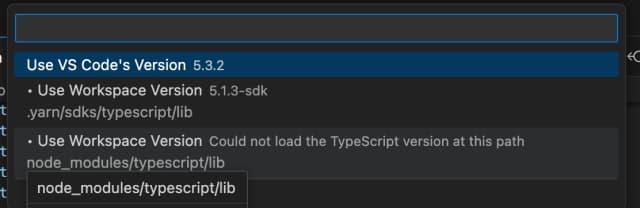
shift + command + p를 눌러서 select typescript version를 선택하여, 사용할 typescript버전을 Workspace로 맞춰준다.
❗ 이 때, vscode의 타입스크립트 버전은 하나이므로 각 패키지 별로 동일한 버전의 typescript를 설치해야 한다.
2. eslint 설정
eslint는 주로 루트에서만 관리한다.
// .eslintrc.json
{
  "env": {
    "browser": true,
    "es2021": true,
    "jest": true
  },
  "extends": ["airbnb", "prettier"],
  "parser": "@typescript-eslint/parser",
  "parserOptions": {
    "ecmaFeatures": {
      "jsx": true
    },
    "ecmaVersion": "latest",
    "sourceType": "module"
  },
  "plugins": [
    "react",
    "react-hooks",
    "prettier",
    "@emotion",
    "jest",
    "jest-dom"
  ],
  "rules": {
    "prettier/prettier": "error"
  },
  "settings": {
    "import/resolver": {
      "typescript": {}
    }
  }
}
❗ Eslint의 경우 루트에는 next패키지가 없기 때문에 eslint-plugin-next를 사용하려면 Next.js어플리케이션 위치를 다음과 같이 알려줘야 한다.
"settings": {
  "next": {
    "rootDir": ["packages/web/"]
  },
}
3. prettier 설정
prettier는 주로 루트에서만 관리한다.
// prettierrc.js
module.exports = {
  trailingComma: 'es5',
  tabWidth: 2,
  semi: true,
  printWidth: 100,
  singleQuote: true,
  plugins: [require('prettier-plugin-tailwindcss')],
};
그 외 설정
-
절대 경로 설정
절대 경로는 각 패키지의 tsconfig에서 설정한다.
// packages/web/tsconfig.json, packages/app/tsconfig.json
{
	baseUrl:".",
	"paths": {
      "@/*": ["./src/*"]
    },
  // ..
}
2. 궁금증
1. 어떤 파일을 루트에서 관리해야할까?
- 각 패키지에서 공통으로 사용하는 패키지
- e.g. babel, testing-library, @types, typescript, jest, prettier
- 모든 패키지에 통틀어 하나만 필요한 패키지
- eslint, husky, lint-staged, gitignore
2. 모노레포 안에 있는 패키지는 루트에만 설치해도 괜찮을까?
https://github.com/NaverPayDev/ts-monorepo-template 에서는 루트에서
3. 레퍼런스
- https://github.com/kowoohyuk/monorepo-template
- https://github.com/NaverPayDev/ts-monorepo-template : 네이버페이 모노레포 템플릿
4. 알게 된 사실
1. tsconfig.json의 include와 exclude는 각 패키지에서 설정해야한다.
"include": [
    "next-env.d.ts",
    "**/*.ts",
    "**/*.tsx",
    ".next/types/**/*.ts",
    ".contentlayer/generated"
  ],
  "exclude": ["node_modules"],