1. 스팩 정의
기능 스팩
- 그림을 그릴 수 있다.
- 검은색, 빨간색, 노란색 등 팔레트가 있어서 클릭하면 펜의 색이 바뀐다.
- 캔버스에 마우스가 올라가면 커서가 펜으로 바뀐다.
- 현재 선택 중인 색으로 커서가 바뀌어, 내가 지금 어떤 색을 선택했는 지 보여준다.
개발 스팩
- HTML의 canvas API를 이용한다.
2. 개발
개발 구상
- canvas태그에 canvasRef를 넘겨 React에서 canvas 돔을 조작한다.
- canvas를 눌렀을 때에 대한 이벤트는 onMouseDown 이벤트 함수로 컨트롤한다.
- submit버튼을 클릭 시 canvas 상태를 저장하고, 다시 접속 시 canvas 상태를 불러온다.
개발
1. canvas돔을 조작하기 위해 ref를 넘겨준다.
💡 돔을 조작하기 위해 ref를 넘기는 이유
요소에 ref를 넘기면, ref.current값을 얻을 수 있으며 이 값을 통해 해당 DOM API에서 제공하는 메서드, 프로퍼티를 사용할 수 있다.
const canvasRef = React.useRef<HTMLCanvasElement>(null);
// ..
return (
	<canvas ref={canvasRef} />
)
2. canvas를 세팅한다.
React.useEffect(() => {
  const canvas = canvasRef.current;
  if (!canvas) {
    return;
  }
  const context = canvas.getContext('2d');
  if (!context) {
    return;
  }
  context.strokeStyle = color;
  context.lineWidth = 5;
  context.lineCap = 'round';
}, [color]);
canvas요소의 돔은 getContext라는 메서드를 제공한다. getContext의 인자로 2d를 넘길 경우 CanvasRenderingContext2D객체를 만들게 된다. 이 CanvasRenderingContext2D객체는 2차원을 나타낼 수 있는 context이다.
💡 React.useEffect?
useEffect는 컴포넌트가 마운트/언마운트 되었을 때 혹은 특정 값이 변경되었을 떄 실행시킬 수 있다.
두 번째 인자 배열에 color값을 넘겨줌으로써, color값이 변경될 때마다 useEffect의 첫 번째 인자 콜백함 수를 실행시킨다.
3. context를 얻는 과정을 모듈화한다.
canvas의 context(canvasRef.current.getContext(’2d’))를 얻는 과정이 위의 useEffect에서 쓰이고, 마우스를 누르고 있을 때에도 반복이 된다. 이러한 과정을 모듈화를 통해 간결하게 만들어보자.
const getCanvasContext = (canvasRef : React.RefObject<HTMLCanvasElement>):CanvasRenderingContext2D | null => {
	const canvas = canvasRef.current;
	if(!canvas){
		return null;
	}
	const context = canvas.getContext('2d');
	if(!context){
		return;
	}
	return context;
}
이제, useEffect코드가 한결 간결해졌다.
React.useEffect(()=>{
	const context = getCanvasContext(canvasRef);
	context.strokeStyle = color;
	context.lineWidth = 5;
	context.lineCap = 'round';
},[])
4. 사용자가 마우스를 누르면 그림을 그리기 시작한다.
💡
onmousedown‘사용자가 마우스를 누른다’는 onmousedown에 해당한다. JS를 이용하여 이벤트에 추가하기 위해서는
elem.onmousedown = function(){}로 추가할 수 있고, 혹은elem.addEventListener(’mousedown’,function(){})로 추가할 수 있다. 또한, html에 직접 함수를 넣어주기 위해서는<canvas onmousedown={function(){}}>로 추가할 수도 있다.첫 번째 방식은 기존 이벤트 함수가 덮어씌어질 수 있기에 권장하지 않는 방식이다. 두 번째 방식은 이벤트를 추가할 때 기존 이벤트가 덮어씌워지지 않고 이벤트가 추가가 된다. 세 번째 방식은 두 번째 방식보다 더 직관적이고, 간결하게 작성할 수 있다.
react에서 세 번째 방식으로 작성할 때, 일반 HTML에서와 다르게 camelCase로 작성해야 한다.
const handleMouseDown = (e : React.MouseEvent<HTMLCanvasElement>) => {
	const context = getCanvasContext(canvasRef);
	const rect = canvas.getBoundingClientRect();
	const x = e.clientX - rect.left;
	const y = e.clinetY - rect.top;
	context.beginPath(); // 새로운 경로를 시작한다.
  context.moveTo(x, y); // 현재 마우스 위치로 드로잉 포인트를 이동시킨다

  const draw = (mouseEvent:MouseEvent) => {
    const x = mouseEvent.clientX - rect.left;
    const y = mouseEvent.clientY - rect.top;
    context.lineTo(x, y);
    context.stroke();
  }
  const stopDrawing = () => {
    window.removeEventListener('mousemove', draw);
    window.removeEventListener('mouseup', stopDrawing);
  };

  window.addEventListener('mousemove', draw);
  window.addEventListener('mouseup', stopDrawing);
}
return(
	<canvas onMouseDown = {handleMouseDown} />
): 엘리먼트의 크기와 뷰포트에 상대적인 위치 정보를 제공하는 DOMRect객체를 반환한다.
즉, 현재 뷰포트를 기준으로 값을 전달한다.
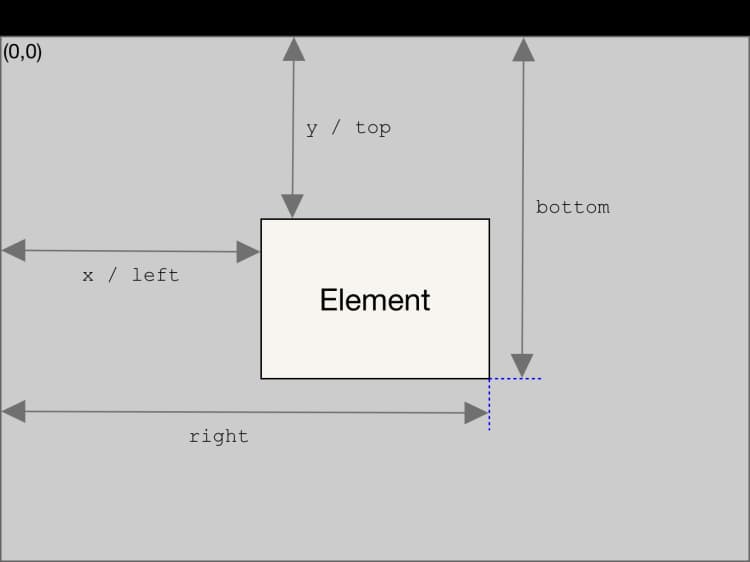
MouseEvent 이벤트의 프로퍼티로, 뷰포트 기준 마우스의 X,Y값을 나타낸다.
❗
clientX/clientYvsoffsetX/offsetY
- offsetX/offsetY : 해당 이벤트와 대상 노드의 패딩 가장자리 사이의 X/Y차이
- clientX/clientY : 마우스의 뷰포트 내의 가로 좌표
- 공통점 : 둘 모두 MouseEvent이다.
x값과 y값은 다음과 같이 구한다 : e.clientX - elem.getBoundingClientRect().left여기서 e.clientX는 마우스의 뷰포트 기준 x좌표를 나타내고, elem.getBoundlingClientRect()는 요소(여기서는 canvas 요소)의 뷰포트 기준 왼쪽 너비를 나타낸다. 즉, 이 둘을 빼면 캔버스 내에서 마우스의 x좌표를 구할 수 있다.
즉, canvas에서의 x와 y좌푤르 구하고 이 위치에 context를 위치시킨다. 그리고 lineTo메서드를 이용하여 그림을 그린다.
💡 CanvasRenderingContext2D 메서드
beginPath: 새로운 경로를 시작할 때 호출moveTo: 주어진 x,y지점에서 새 하위 경로를 시작한다.lineTo: 지난 점으로부터 일직선의 선을 연결한다.stroke(): 현재 또는 지정된 경로를 현재 stroke 스타일로 획을 그린다.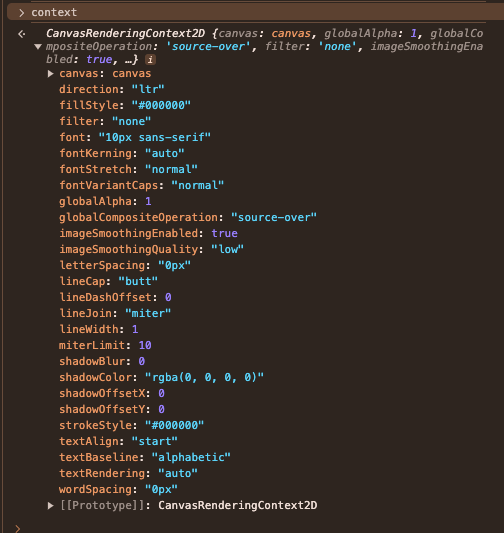
web브라우저에서 테스트하기
1. 개발자 모드 > 요소 선택 > 아무 요소 선택하기 2. 아래 코드를 console에서 복사 > 붙여넣기```typescript const canvas = document.createElement('canvas'); $0.appendChild(canvas); const context = canvas.getContext('2d'); context.strokeStyle = 'red'; context.beginPath(); context.moveTo(0,0); context.lineTo(100,100); context.stroke(); ```
5. 팔레트를 만들어, 색 변경을 할 수 있다.
context.strokeStyle에 값을 입력하여 펜의 색을 변경할 수 있다.
const { canvasRef, handleMouseDown, resetCanvas } = useCanvas({
  color,
});
색에 대한 상태값을 useCanvas를 사용하는 측에서 관리하고, useCanvas에 인자로 color를 넘겨준다.
폼 상태 관리로 react-hook-form라이브러리를 사용하고 있으므로, react-hook-form 기준으로 작성하도록 하겠다.
const { color } = useForm();
const { canvasRef, handleMouseDown, resetCanvas } = useCanvas({
  color,
});
return(
	<CanvasPalette control={control} />
)
control객체를 CanvasPalette에 props로 전달한다.
💡 control
: react.hook form에서 컴포넌트에 등록하기 위한 메서드를 제공한다.
이 control을 이용하여 하위 컴포넌트(여기서는 CanvasPalette)에서 color에 대한 상태값을 관리할 수 있는 책임을 넘긴다.
const CanvasPalette = ({ control }) => {
  return (
    <Controller
      control={control}
      name="color"
      render={({ field }) => (
        <div>
          {PALETTE_COLORS.map(palette => (
            <Box onClick={() => field.onChange(palette)} />
          ))}
        </div>
      )}
    />
  );
};
6. canvas를 초기화한다.
CanvasRenderingContext2D.clearRect메서드를 이용하여 캔버스를 초기화할 수 있다.
const resetCanvas = () => {
  context.clearRect(0, 0, canvas.width, canvas.height);
};- 앞의 인자부터 x,y,width,height이다.
7. 마우스 호버 시 펜을 변경한다.
-
cursor: url(’’);
-
MUI 기준
import CursorImage from './pen.svg';
// ..
return(
	<canvas
		sx={{
		  '&:hover': {
		    cursor: `url(${CursorImage}), pointer`,
		  },
		}}
	/>
);
8. 펜이 정위치에 위치하지 않는다.
- cursor의 두 번째 인자로 설정할 수 있다.
- 기존 : 펜의 끝다 위로 16px정도에 그림이 그려졌다.
- 0 16으로 설정하였다. → y좌표가 +16px되어, 펜이 옮겨졌다.
9. canvas를 저장한다.
Canvas요소에서 제공하는 toDataURL메서드로 canvas상태를 저장하고,
💡 HTMLCanvasElement.toDataURL()
canvas요소는 toDataURL()이라는 메서드를 제공한다.

메서드를 사용하면 base64형식의 데이터를 리턴한다.
canvasContext.drawImage를 이용하여 이미지를 넣을 것이다.
이미지를 canvas에 그릴 수 있게 해준다.
React.useEffect(()=>{
	const context = getCanvasContext(canvasRef);
	const img = new Image();
	img.onLoad = function(){ // img가 로드되면 실행한다.
		context.drawImage(img,0,0);
	}
	img.src = intialCanvas || '';
},[initialCanvas])
10. 태블릿/휴대폰에서 동작하도록 한다.
PC에서 마우스를 누르기 시작하는 동작이 onMousedown이라면, 태블릿/휴대폰에서 손으로 누르는 동작은 onTouchStart이다. 이 함수를 이용하면 된다. onTouchStart가 넘겨주는 TouchEvent에는 touches배열이 존재하고, touches[0]은 첫 번째 누른 것을 의미하며, clientX와 clinetY프로퍼티를 가지고 있다.
따라서 아래와 같이 구현할 수 있다.
const handleTouchStart = (e: React.TouchEvent<HTMLCanvasElement>) => {
  const canvas = canvasRef.current;
  const context = getCanvasContext(canvasRef);
  if (!context || !canvas) {
    return;
  }

  context.strokeStyle = color;
  context.lineWidth = 5;
  context.lineCap = 'round';

  const rect = canvas.getBoundingClientRect();
  const x = e.touches[0].clientX - rect.left;
  const y = e.touches[0].clientY - rect.top;

  context.beginPath();
  context.moveTo(x, y);

  const draw = (touchEvent: TouchEvent) => {
    const x = touchEvent.touches[0].clientX - rect.left;
    const y = touchEvent.touches[0].clientY - rect.top;
    context.lineTo(x, y);
    context.stroke();
  };

  const stopDrawing = () => {
    window.removeEventListener('touchmove', draw);
    window.removeEventListener('touchend', stopDrawing);
  };

  window.addEventListener('touchmove', draw);
  window.addEventListener('touchend', stopDrawing);
};
결과물
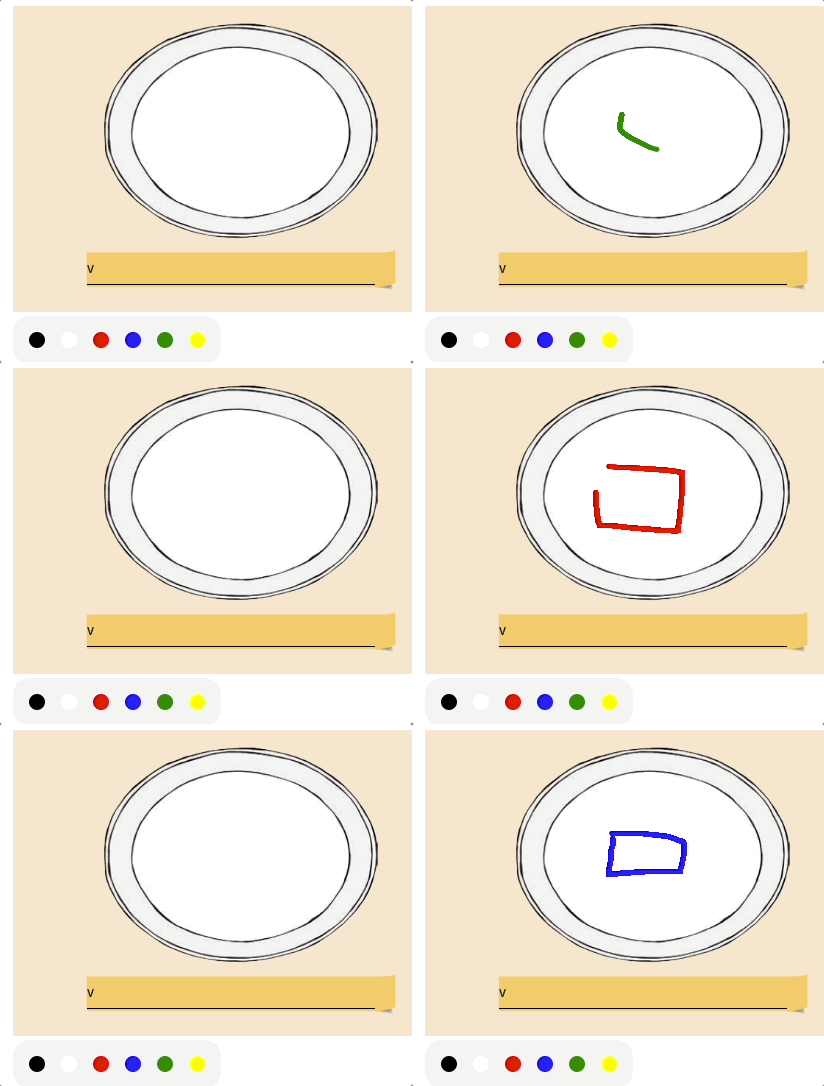
영상에는 커서가 안찍힌다.
트러블 슈팅
1. canvas 크기 조절이 마음대로 되지 않는다.
canvas의 style로 width/height를 변경하면, 그대로 적용이 되지 않는다.
canvas의 기본 크기는 300x150이다. css를 이용하여 width나 height를 변경할 경우, 화면에 표시되는 크기만 변경되며 내부 그리기 버퍼의 크기는 그대로 유지된다. 따라서, canvas의 크기를 조절하기 위해서는 css가 아닌 속성값으로 widht나 height를 지정해야한다.
2. Cursor : url()이 정상적으로 동작하지 않는다.
-
정상적으로 동작한 코드
cursor: url('https://assets.digitalocean.com/labs/doicons/general-purpose-droplet.svg?cb=1'),
    url('https://assets.digitalocean.com/labs/doicons/general-purpose-droplet.svg?cb=1'),
    move;
import CursorImage from './1.svg'; // .. sx={{ '&:hover': { cursor: `url(${CursorImage}), pointer`, }, }}
cursor : url(’경로’)을 해봐도, cursor:url(경로)을 해봐도 적용이 안된다.
새로 알게 된 사실
- 용량이 큰 png파일은 안된다.
- svg의 큰 사이즈는 커서로 적용이 되지 않는다.