탐구
1. 이벤트 버블링
한 요소에 이벤트가 발생하면, 이 요소에 할당된 핸들러가 동작하고, 이어서 부모 요소의 핸들러가 동작한다. 최상단의 조상 요소를 만날 때까지 이 과정이 반복되면서 요소 각각에 할당된 핸들러가 동작한다.
- event.target vs this
- event.target : 이벤트가 발생한 가장 안쪽 요소
- 실제 이벤트가 시작된 ‘타겟’요소
- event.target : 이벤트가 발생한 가장 안쪽 요소
- 버블링이 진행되어도 변하지 않는다.
- event.currentTarget(this) : 현재 요소로, 현재 실행 중인 핸들러가 할당된 요소
- event.eventPhase : 현재 이벤트 흐름 단계
- 캡처링 = 1, 타겟 = 2, 버블링 = 3
- 거의 모든 이벤트는 버블링 된다.
- focus와 같이 버블링되지 않는 이벤트도 있다.
버블링 중단하기
event.stopPropagation() :핸들러에게 이벤트를 완전히 처리하고 난 후 버블링을 중단하도록 명령버블링은 꼭 멈춰야 하는 명백한 상황이 아니라면 막지 마세요. 아키텍처를 "잘 고려해 진짜 막아야 하는 상황에서만 막으세요. stopPropagation을 사용한 영역은 ‘죽은 영역’이 되어 시스템 코드가 정상 동작하지 않을 수 있습니다.
event.stopImmediatePropagation(): 핸들러 중 하나가 버블링을 멈추더라도 나머지 핸들러는 여전히 동작한다.
2. 이벤트 캡처링
이벤트 캡처링은 이벤트 버블링과 반대로, 최상단의 조상 요소에서 타겟 요소까지 이벤트가 전파되는 단계이다.
표준 DOM 이벤트에서 정의한 이벤트 흐름엔 3가지 단계가 있다.
- 캡처링 단계 : 이벤트가 하위 요소로 전파되는 단계
- 타깃 단계 : 이벤트가 실제 타깃 요소로 전파되는 단계
- 버블링 단계 : 이벤트가 상위 요소로 전파되는 단계
addEventListener의 세 번째 인자를 true로 설정하면 캡처링이 활성화된다. (default는 false)
3. 이벤트 위임
: 요소마다 핸들러를 할당하지 않고, 요소의 공통 조상에 이벤트 핸들러를 단 하나만 할당하여 여러 요소를 다루는 것
- 공통 조상에 event.target을 이용하면 실제 어디서 이벤트가 발생했는지 알 수 있다.
장점
- 많은 핸들러를 할당하지 않아도 되기 때문에 초기화가 단순해지고 메모리가 절약됩니다.
- 요소를 추가하거나 제거할 때 해당 요소에 할당된 핸들러를 추가하거나 제거할 필요가 없기 때문에 코드가 짧아집니다.
innerHTML이나 유사한 기능을 하는 스크립트로 요소 덩어리를 더하거나 뺄 수 있기 때문에 DOM 수정이 쉬워집니다.
단점
- 이벤트 위임을 사용하려면 이벤트가 반드시 버블링 되어야 합니다. 하지만 몇몇 이벤트는 버블링 되지 않습니다. 그리고 낮은 레벨에 할당한 핸들러엔
event.stopPropagation()를 쓸 수 없습니다. - 컨테이너 수준에 할당된 핸들러가 응답할 필요가 있는 이벤트이든 아니든 상관없이 모든 하위 컨테이너에서 발생하는 이벤트에 응답해야 하므로 CPU 작업 부하가 늘어날 수 있습니다. 그런데 이런 부하는 무시할만한 수준이므로 실제로는 잘 고려하지 않습니다.
활용 사례
elem.onClick = function(event){
	const target = event.target;
	if(target.tagName!="TD") return;
	hightLight(target);
}
function highlight(td) {
  if (selectedTd) {
    selectedTd.classList.remove('highlight');
  }
  selectedTd = td;
  selectedTd.classList.add('highlight'); // 새로운 td를 강조 함
}- target : 이벤트가 발생한 요소
리액트와 이벤트 위임
- 리액트는 합성 이벤트라는 객체를 이용해 이벤트를 처리한다.
- 합성 이벤트 : DOM의 Event생성자로 생성한 이벤트는 브라우저가 생성하는 이벤트와 구분하기 위해 합성 이벤트라 부른다.
- 브라우저별 호환성과 사용자의 편의성을 위해 사용
- 리액트는 root DOM Node에 모든 이벤트 핸들러들을 부착하여 이벤트 위임을 통해 모든 이벤트를 제어한다.
- 실제로 이벤트 발생 시
- 버튼 클릭 > click 이벤트 감지 > 해당 이벤트 리스너 트리거 > 리액트에서 정의한 dispatchEvent함수 호출
- 넘어온 이벤트 객체로부터 event.target을 식별하여 내부적으로 사용하는 internalInstanceKey를 이용하여 해당 DOM Node와 매칭되는 Fiber node를 확인
- Fiber node가 확인되면, 해당 노드로부터 출발해서 루트 노드까지 Fiber Tree를 순회하며 마치 이벤트 버블링처럼 매칭되는 이벤트를 가지고 있는 Fiber Node를 발견할 때마다 이벤트 리스너가 실행할 함수들을 DispatchQueue배열로 저장
- root 에 도착하고 나면,
DispatchQueue를 반복문으로 순회하면서event와listeners,inCapturePhase(이벤트 캡쳐링 여부)l를 추출해processDispatchQueueItemsInOrder함수를 실행시킨다. processDispatchQueueItemsInOrder함수에서는 fiberNode instance, currentTarget, listener함수를 추출하여 이벤트 캡쳐링 여부에 따라 실행 순서를 역전시키고 propagation 여부를 검사 및 이벤트 중복 여부를 확인한 이후에executeDispatch함수를 실행시킨다. 즉 이벤트를 실행한다.
2. 실습
1. 이벤트 버블링
-
index.html
<!DOCTYPE html> <html lang="en"> <head> <meta charset="UTF-8"> <meta name="viewport" content="width=device-width, initial-scale=1.0"> <title>Document</title> <link rel="stylesheet" href="./index.css"> </head> <body> <div id="grandParent"> <div id="parent"> <div id="child"> </div> </div> </div> </body> <script> const child = document.querySelector("#child"); const parent = document.querySelector("#parent"); const grandParent = document.querySelector("#grandParent"); child.addEventListener('click', () => { console.log('child') }) parent.addEventListener('click', () => { console.log('parent') }) grandParent.addEventListener('click', () => { console.log('grandParent') }) </script> </html> -
index.css
#child{
  width:100px;
  height:100px;
  background:black;
}

#parent{
  width:200px;
  height:200px;
  background:blue;
}

#grandParent{
  width:300px;
  height:300px;
  background:yellow;
}
-
child요소를 눌렀을 때
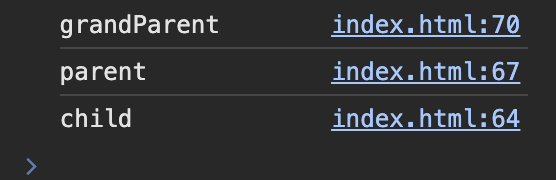
이벤트가 가장 부모 요소인 document부터 버블링이 되어 document > html > body> #grandParent > #parent > #child로 이벤트가 전파된다. 즉 상위 요소부터 console이 찍힌다.
-
grandParent요소를 눌렀을 때

콘솔을 출력하는 요소 중 가장 상위 요소인 grandParent가 출력이 된다.
2. 이벤트 캡처링
child.addEventListener('click', () => {
  console.log('child')
},true )
parent.addEventListener('click', () => {
  console.log('parent')
},true )
grandParent.addEventListener('click', () => {
  console.log('grandParent')
},true )-
child요소를 눌렀을 때
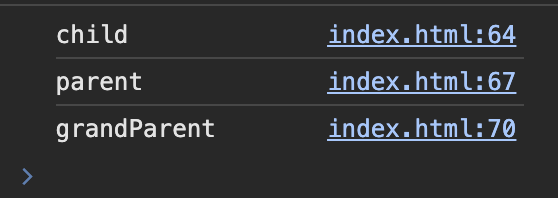
기존 grandParent부터 child 순으로 출력하던 이전과 달리 child부터 grandParent로 출력하였다. 기존 버블링이 아니라 캡처링 방식으로 바뀐 것이다.
-
grandParent를 눌렀을 때

grandParent를 눌렀을 때는 물론 기존과 동일하게 grandParent만을 출력한다.
3. 이벤트 위임
-
table부모 태그에 자식 태그들의 이벤트를 위임
<div> <table> <tr> <th colspan="3"><em>제목</em></th> </tr> <tr> <td>hello1</td> <td>hello2</td> <td>hello3</td> </tr> <tr> <td>hello4</td> <td>hello5</td> <td>hello6</td> </tr> </table> </div> <script> const tableEl = document.querySelector('table'); tableEl.addEventListener('click', (e) => { const target = e.target; if (target.tagName === 'TD') { console.log(target.textContent) } }); </script> </html> -
data-set을 활용
<div id="menu"> <button data-action="save">저장하기</button> <button data-action="load">불러오기</button> <button data-action="search">검색하기</button> </div> <script> class Menu { constructor(elem) { this._elem = elem; elem.onclick = this.onClick.bind(this); // (*) } save() { alert('저장하기'); } load() { alert('불러오기'); } search() { alert('검색하기'); } onClick(event) { let action = event.target.dataset.action; if (action) { this[action](); } }; } new Menu(menu); </script> -
행동 패턴으로 추가
첫 번째 카운터: <input type="button" value="1" data-counter>
두 번째 카운터: <input type="button" value="2" data-counter>

<script>
  document.addEventListener('click', function(event) {

    if (event.target.dataset.counter != undefined) { // 속성이 존재할 경우
      event.target.value++;
    }

  });
</script>
dataset으로 counter를 가지고 있는 (data-counter 속성) 태그에 이벤트 추가
❗ 문서 레벨의 핸들러를 만들 때 항상 onClick보다 addEventListener를 사용하세요.
document.onClick은 충돌을 일으킬 가능성이 있다. 기존 핸들러를 덮어쓸 수 있다. 그렇기에 addEventListner을 사용하세요.